Beverages
Kegerator Review: EdgeStar KC2000 vs Keggermeister KM2800BK
There’s huge trend for tailgate party fans to equip their own homes with kegerators, setting up their BBQ/grill areas as a perfect homegating venue. Isn’t that the Great American Dream? Well, it’s reality for so many people now that I have a few reviews of the more fixed kegerators. The kegerator review below checks out the Edgestar KC 2000 and the Keggermeister KM2800BK which are both mid-range price-wise, both are single taps but fall into the category of small café size/big party size (as you will see in their specs). They are well-priced and actually will save you money on your beer purchases over time. Since the beer stays chilled and fresh for up to three months, it seems like a way to go. So, read on for this very detailed kegerator review in which we compare the Edgestar KC2000 with the Keggermeister KM2800BK and find out which one is right for you!
Note that these are not for outdoors but in the man-cave or even the kitchen or just a bar area. They kind of both polarize their customers so I have set out to try to figure out why. In my experience, and after reading more than just one kegerator review, some people will either LOVE the Edgestar KC2000 and hate the Keggermeister KM2800BK or LOVE the Keggermeister and hate the Edgestar. Why? Yes, there IS a reason.
Kegerator Review: Edgestar KC-2000.
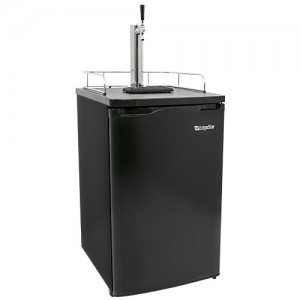
EdgeStar KC-2000
Can’t for the life of me work out why this model, made at the same place as other Edgestar Kegerators, has received so much negative feed-back. All I can say is that occasionally in manufacturing, there is one lemon. One of these may be it. And yet it also gets glowing reviews. It is made with the same solid-state attention as others we review but somehow, there are problems with sizing and with the temperature.
I spoke with my pal, Seth, about this conundrum and what he said seems to make sense. The KC 2000 is specifically made for certain kegs that are listed on its specs and also are well identified by name, capacity, cup quantity and any problems you may encounter (such as the rim around some of the kegs in their designs). If you use this list as a guide (ie. do your homework) you should be quite safe with this kegerator. Another aspect he stressed was that all kegs need to be pre-cooled before use. Many users skip this step, but it is vital. Every time your kegerator welcomes its load of sweet amber nectar, the kegerator needs a 24 HOUR cooling period, no cribbing on the time, please, your lines and so on must be spotless and gunk free and the beer itself needs to be pre-chilled. It is pointless loading a warm keg into the kegerator as all it will tap is foam and that will overflow and waste beer.
It’s a nice, black finished kegerator and it does look darn suave in the man-cave.
Firstly, you must be aware that this kegerator CANNOT be used outside. It is strictly for indoor use. If you use anything apart from an outdoor kegerator I say, a BBQ area or even in the parking lot, out in the sun, you will compromise the temperature, your beer will bubble and froth like a witch’s cauldron and you will waste your brew. It will not be kept cold. Pure and simple.
However, in an indoor application, this is really good if you treat it right.
Owning a kegerator does require some dedication and logic. You must clean it regularly for a start.
Follow the instructions, check the interior size in the specifications sheet and you should be fine. Especially in regards to pre-cooling before any keg is installed. Also use only the keg specified to slot easily inside – there’s a list of recommended sizes. For instance, the Kegerator KC 2000 specifies that half barrel will fit. So don’t go trying to fit a full sized barrel in it! The interior is 14.5 inches deep–from the condenser shelf in the back to the front edge at the door. If you intend using kegs with the additional rim, they will not fit, so make sure you select the keg to suit this model. Pony size, for instance will not fit due to the temperature gauge at the top and the hoses inside.
This is considered a mid-budget kegerator and, as such, is not going to be in the league of say, a Viking industrial refrigerator or your Miele imported kitchen appliances. However, it is engineered to last and another hint is to check it all over when you remove it from the box. Make sure that any screws, bolts etc. have not jiggled loose in transit. There is an element of assembly in owning one of these. I have not a lot of skills in that area and I sort of figured that a heap of owners may have just jammed it together. If you don’t put the door on right, then nothing will fit properly. Again, read the instructions and if you can’t figure it out, find a 10 year old child to do it for you. Never assemble while drunk. Drinking and assembling is a beer hazard.
Some reviewers say that the materials used in couplings and spellings are inferior. If this is the case, call the company who sent it to you and get them to pressure Edgestar as I get the impression the manufacturing company doesn’t have great people skills. Sounds like they’d rather make or use kegerators than deal with their customers. Well, that’s a crying shame as they have a large chunk of the market share.
So if you don’t have the courage to take all this on, what is the alternative? Maybe this will do it ….
Kegerator Review: Keggermeister KM2800BK Kegerator

Keggermeister KM2800BK Kegerator
Designed for home brewers or just regular beer drinkers, the Keggermeister KM2800BK is a full-size single-tap refrigerator. The makers claim it will keep your beer chilled and prevent it from going flat for up to three months. Bingo! Make or buy beer to put in it. (Be sure to check keg sizes). The stainless steel tower features a black and chrome spout that can accommodate a variety of different height beer glasses, mugs, Red Solo cups in all sizes, Mason jars if you’re a hipster or even bottles. There’s a chrome guardrail on the top so that you can line those glasses up on the counter-style top. The black exterior adds a very stylish finish and it is durable. Four tough casters will make it easy to move for cleaning or just for changing position. The temperature control is adjustable and of course, there are instructions on what temp is the ideal for beer.
This is labeled ‘full-sized’ so a full sized keg should fit. The specs say it accommodates a full-size keg, pony keg, or 2 5-gallon kegs. These, by the way, are enough for a decent party and there is a great chart on how many glasses you can tap from each keg here:
(http://www.kegerator.com/article?cgid=Kegerators&aid=keg-sizes-chart)
This is by far the best reference on the web for keg sizes and what each can deliver.
Note that this is a single tap beer dispenser and you won’t have the choice between beers.
As with all the larger models, the 2.5 pound CO2 bottle is included. I had a lot of specific enquiries on where to access CO2 for refills. Most areas have a dealer in gas and the best people, I find, to provide this service on a reliable basis are your paintball companies. The fill only costs around $10 at present. Cheap! Whoohoo, check out the paintballing and maybe you will want to spend a day splattering each other with something other than beer!
http://www.hollywoodpaintball.com/
Tempting ….. though it does take time away from the beer.
At 35.5 x 28.1 x 23.5 inches it is a large kegerator. While the item is around 80 pounds, when shipped it weighs almost 100 pounds. The shipping packaging in this kegerator is awesome. Double boxed with poly in between and small components and instructions in a small container, well-wrapped – so they don’t get lost. I liked the instruction book for this one as it is clear and has pictures that actually relate to the kegerator. It is a simple job to put it together. That gets 5 stars from me as so many units are damaged in shipping. The makers label this well with ‘This side up’ and ‘fragile’ so someone is taking care.
Be sure to invite some burly friends on delivery day, unwrap, read the instruction book together, christen it with a red solo cup of bottled beer, follow the instructions in regard to leaving it to cool down for at least 24 hours (many recommend 3 days prior chilling) and don’t add the (pre-cooled) keg of beer until it has reached Beer Chill Optimum temperature. Good hand-brewed (boutique) beer is generally drunk at a temperature of between 38° to 45° F as like cheese, it needs a little bit of warmth for the taste-buds to snap to attention. Of course, serving it warm as they do in the U.K. is not an option in my neck of the woods.
Just so you know, the unit is virtually silent. There’s a slight motor sound when you switch it on, but after that, it just quietly chills and serves the beer without complaint
Here are a few hints from other users. If you are opening and closing the door a lot, this will impact on your overall temperature. So don’t. But maybe you need to? A good idea is to add a little cooling fan in the back of the unit to circulate the air. This tiny fan runs off a computer, or any power outlet that is USB compatible (think chargers) or your computer or solar charger.
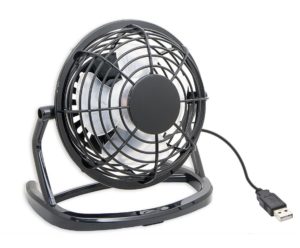
IO Crest USB Powered Desktop cooling fan
You can run the cable through the kegerator quite easily. Outdoor kegerators are definitely tricky in regard to maintaining optimal temperature but the fan certainly helps.
Some users like to customize by adding a small motor to force cold air up the tower for super-chilled beer which you can do with any of the manufactured brands (any that have ‘Ice’ in the title, for instance or those you purchase at Ralph’s).
The unit is only available in the U.S. at present.
You could add a dual or even triple tap conversion kit but in that case, you would be restricted to really small kegs which may not fit so I don’t even advocate a dual. Better in that case to buy a couple of small kegerators (under $100) on the side and set up your beer smorgasbord that way. Say, Guinness style in one and a Pilsener style in the other. You can run almost any beer through it Pyramid Hefeweizen, Budlight, Budweiser, Dos Equis, Corona, Stella, Heineken and more. Just check the keg size each time on the comparison chart or you may strike trouble.
When you do your first pour, don’t open the CO2 valve to the maximum. This will over-pressurize the keg and you will have a foamy overflow. With the valve in closed position, adjust the regulator to a position that is minimally open to begin with and pour your first glass. Take a moment to sip. If you ever accidentally over pressurize the tank, pull the pressure release pin on the coupler, release the built-up CO2 in the keg and start again. No problems! Drink another test glass.
Some people like to pour a jug of beer for the table. Pre-chill your jugs for a nice frosty drink and the head will be perfect and will stay for the life of the beer in the jug which, in my Grillstation area is an easy task. Those Corkcicle Chillsner Beer Chillers can add a nice touch!
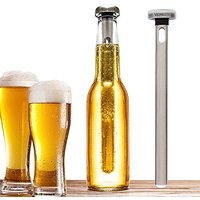
Keep beer cool with chill sticks
The tap handle can be changed to one of your own choosing, say a customized one or a team one for your homegating …
Don’t over chill by the way. Beer popsicles are not that nice. And hard to get out of a keg.
If you have ANY problems, no matter how small, call the manufacturer. Make sure that you have followed the advice above and read all instructions well. Be patient. You are dealing with some gases and temperatures here which need adjusting and balancing.
Note that with the Keggermeister, you can buy a stainless steel version if you so desire. The Keggermeister is shipped with additional parts and a dual regulator so that is a plus.
EdgeStar KC2000 or Keggermeister KM2800BK: Which is better?
Ok, you’ve read the kegerator review of the Edgestar and the review of the Keggermiester. But what is the conclusion here? They each have their avid fans, they each have their haters. It certainly seems that installation could be the main problem as the pressure set up is a little vague in the instructions. Do not run at full open position (on the CO2 tank. Just start small. After a few changes of position and a few foamy beers (yes, go on, you know you want to drink it!) you will find the right position. It just takes time and experimentation. If you are one of those rare buyers who received a broken kegerator, complain! Raise the roof till you get good service. And remember that cleaning is just a small price to pay for beer that stays fresh and chilled for three months. The payback is that you will save 50% of beer money by using the kegerator. Either one. I have no preference. They each seem to suffer from the same critiques and the users who are diligent about the installation/cleaning/setup rules seem to do OK. So here are some videos that will assist you in that crucial set up step.
Video: How to set up the Keggermeister Kegerator
Video: How to set up the EdgeStar KC2000
Let the drinking begin!